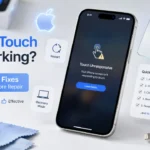
Introduction to How to Record iPhone Screen on iPhone
Learning How To Add a Screen Record On iPhone should be easy, but many people still get stuck at the very first step: the Screen Recording button is not visible in Control Center. The good news is that Apple’s current process is straightforward. You add Screen Recording once, then use it whenever you need to capture your screen, whether that is for a tutorial, app demo, bug report, or quick memory you do not want to lose.
This guide shows you the exact tap path, how to record with sound, where the video is saved, and how to fix the most common problems when Screen Recording is missing or not working. It is written for beginners, but it includes enough troubleshooting detail to be useful even if you have already tried the obvious steps. Apple’s support also confirms that recordings save automatically to Photos and that some apps may block screen capture, so we will cover those limits too.
What Is Screen Recording on iPhone?
Screen Recording is Apple’s built-in feature that captures everything happening on your iPhone display. It records the app you are using, the menus you open, and the actions you take on screen. Apple includes it inside Control Center, so once the control is added, you can start recording with a couple of taps.
It is useful for:
- Making step-by-step tutorials
- Showing someone how to use an app
- Saving a process for later
- Recording an issue for support
- Capturing gameplay or short demos
- Creating voice-over walkthroughs with microphone audio
The big advantage is that you do not need a third-party app for basic screen recording. Apple’s own guide is enough for most users.
Why does this problem happen
If Screen Recording is missing or confusing on your iPhone, it usually comes down to one of these reasons:
- Screen Recording was never added to Control Center
- You are using an older control layout and looking in the wrong place
- Screen Time or other restrictions are limiting a built-in feature
- Screen mirroring is active, which blocks recording
- The app you are trying to record does not allow capture
- The microphone audio was not enabled before starting
- The device storage is too low to save the video
- The user is following an outdated guide instead of the current Control Center method
Apple’s current guidance is clear that the control must be added through Control Center editing, that some apps may not allow recording, and that screen recording cannot be used at the same time as screen mirroring.
How to Add Screen Record on iPhone
Fix 1: Add Screen Recording to Control Center
This is the main fix and the one most users need.
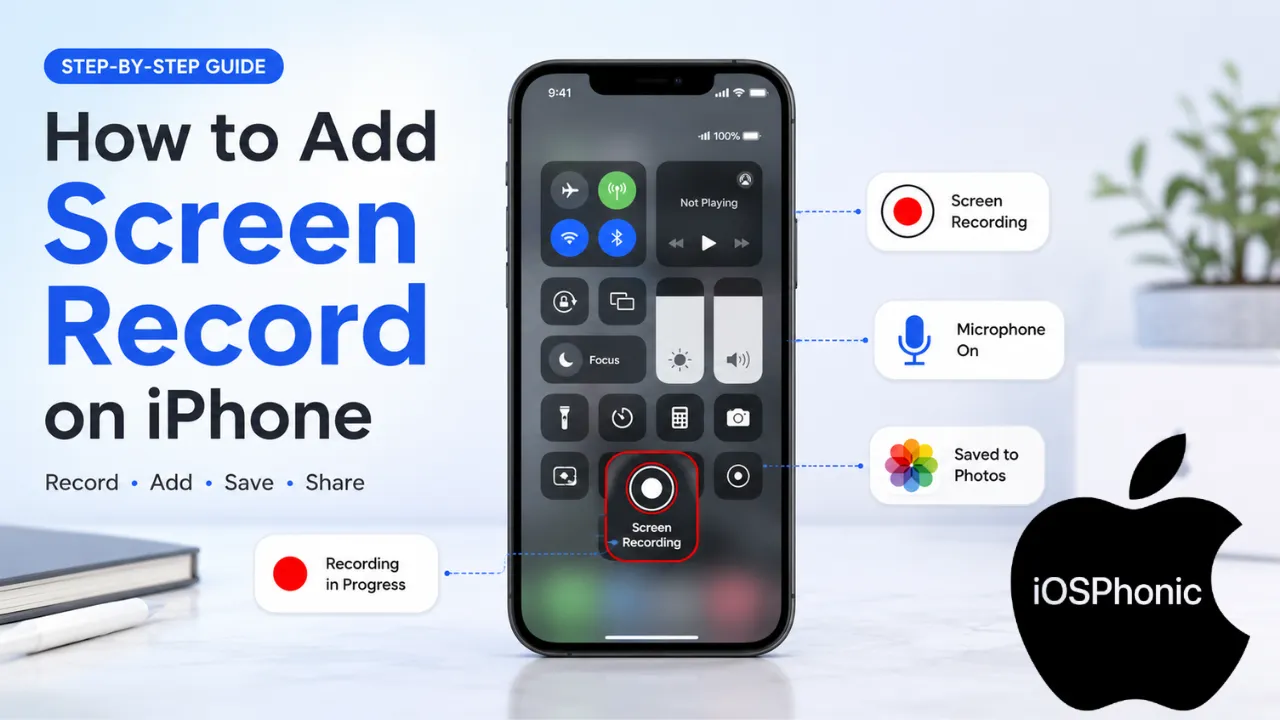
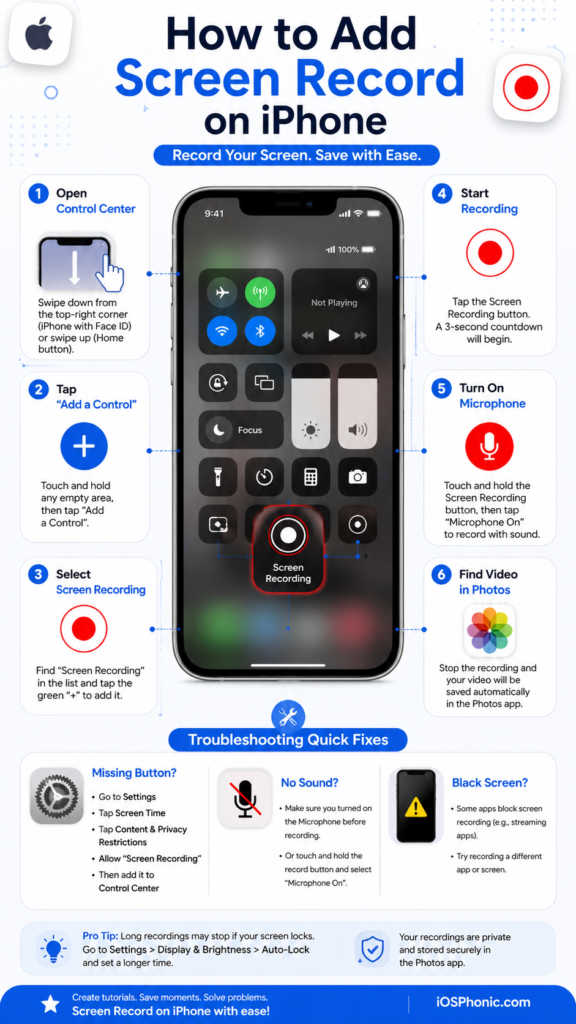
- Open Control Center.
- On iPhone X and later, swipe down from the top-right corner of the screen.
- Touch and hold the background of Control Center.
- Tap Add a Control.
- In the controls gallery, tap Screen Recording.
- Close Control Center.
Apple says you only need to do this once. After that, Screen Recording stays in Control Center for future use.
If you are on an iPhone with a Home button, Apple’s general Control Center guidance says to open Control Center by swiping up from the bottom edge instead.
Fix 2: Start Recording the Right Way
After the screen recording is added:
- Open the app or screen you want to record.
- Open Control Center again.
- Tap the Screen Recording button.
- Wait for the 3-second countdown.
- Leave Control Center and perform the action you want to capture.
- Tap the red circle at the top of the screen to stop recording.
Apple’s guide confirms that the recording starts after the countdown and saves automatically when you stop it.
Fix 3: Turn On the Microphone for Voice Audio
If you need to speak while recording:
- Open Control Center.
- Touch and hold the Screen Recording button.
- Tap the microphone to turn it on.
- Tap Start Recording.
Apple’s current instructions say this microphone option appears before the countdown begins, so you should enable it first if you want voice narration.
This is the detail that many users miss. A single tap usually starts a silent screen recording. A long press opens the microphone option.
Quick Fix Checklist
Use this fast checklist if you just want the shortest path to a working screen recording:
- Add Screen Recording to Control Center
- Open Control Center from the correct swipe direction
- Long-press the button if you need the microphone audio
- Stop recording with the red circle at the top
- Check Photos for the saved video
- Turn off screen mirroring if recording fails
- Test a different app if the screen goes black
- Check the storage if the video does not save
Apple confirms the save location and the two major limits: some apps may block recording, and screen mirroring cannot be used at the same time.
How to Record iPhone Screen With Sound
If your goal is to make a tutorial or explain a fix, sound matters. The cleanest method is to use the microphone.
- Open Control Center.
- Touch and hold Screen Recording.
- Tap the Microphone so it turns on.
- Tap Start Recording.
- Speak normally while you work through the steps.
- Stop the recording when finished.
This records your voice narration while your iPhone captures the screen. Apple’s support specifically points users to the microphone toggle in Control Center before the countdown begins.
One practical tip: Use this only in a quiet environment if you want the voice track to sound clean. A noisy room can make the final video harder to understand, especially for tutorials.
Where Screen Recordings Are Saved
Once you stop the recording, the video is saved automatically in the Photos app. Apple says you can find screen recordings in Photos > Collections > Media Types > Screen Recordings.
That means you do not need to export the file manually just to keep it. After saving, you can trim it, share it, or move it to another app later. Apple also points to Photos as the place where screen recordings live after capture.
Why Screen Recording Is Missing on Your iPhone
If the Screen Recording button still does not show up, these are the most common causes:
1. You have not added it yet
This is the most common reason. You need to enter Control Center edit mode and add it from the controls gallery. Apple’s current support page shows that exact path.
2. You are following an old tutorial
Many older guides still say things like Settings > Control Center > Customize Controls. That was the older workflow, but Apple’s current instructions use Control Center editing with Add a Control.
3. Screen Time restrictions are involved
Apple’s Screen Time settings let you control built-in apps and features on a child’s iPhone, so restrictions can be part of the reason a control is hidden or unavailable. The exact menu structure depends on the device and family settings, but restriction-based troubleshooting is worth checking if the feature seems blocked.
4. Another display feature is interfering
Apple says screen recording and screen mirroring cannot be used at the same time. If you are mirroring to another display, stop that first and try again.
5. The app blocks recording
Protected or rights-managed apps may not permit screen capture. Apple states that some apps might not allow their content to be recorded.
6. Storage is too low
If your iPhone is nearly full, the recording may fail to save properly. This is a common troubleshooting point in practical guides because the file needs space in Photos to land successfully.
Step-by-Step Troubleshooting for Screen Recording Not Working
Fix 4: Restart Your iPhone
A restart can clear a temporary glitch that keeps Control Center controls from behaving normally. Several troubleshooting guides include this as the first step because it is fast and harmless.
Fix 5: Re-add Screen Recording to Control Center
If the button appears broken, remove it and add it again.
- Open Control Center.
- Enter edit mode.
- Remove Screen Recording.
- Add it back from Add a Control.
- Test again.
HowToIsolve recommends re-enabling the control as a practical fix when the button disappears or becomes unreliable after an update.
Fix 6: Check Screen Time and Restrictions
Open your Screen Time settings and confirm that nothing is blocking built-in features. Apple’s Screen Time system is used to manage features and restrictions, especially on child devices, so it is one of the first places to inspect if Screen Recording seems hidden.
Fix 7: Turn On the Microphone Before You Tap Start
If your recording has no voice, do not assume the feature is broken. The microphone must be enabled before the countdown begins. Apple’s instructions and multiple current guides agree on this press-and-hold step.
Fix 8: Free Up Storage Space
Delete unused videos, large attachments, old downloads, or apps you do not need. If the iPhone is out of room, the recording may not save correctly. This is a common cause in modern troubleshooting guides, and it is one of the easiest things to fix.
Fix 9: Stop Screen Mirroring
If your screen is being mirrored to another device, turn that off first. Apple explicitly says you cannot record your screen and use screen mirroring at the same time.
Fix 10: Test in a Different App
If one app shows a black screen but another app records normally, the issue is probably app-level protection, not your iPhone. Apple says some apps may not allow their content to be recorded. That is normal behavior for some protected content.
Advanced Fixes
These are optional and only for stubborn cases.
Reset All Settings
Some troubleshooting guides recommend Reset All Settings when the feature still fails after the basic fixes. This is a deeper step and should be treated as a last resort because it resets many system preferences, even though it does not erase personal data.
Update iPhone and Apps
If your iPhone is behaving oddly after an update, install the latest iOS release and update your apps too. This is especially useful when a bug affects Control Center behavior or how recordings save. Current troubleshooting guides commonly recommend this after a restart and re-add cycle.
Check the Screen Capture Settings
Apple also has a Screen Capture settings area under General, where you can adjust screenshot and recording-related options. This is not the first place to look for a missing button, but it is useful to know exists when you are tuning how captures behave on your iPhone.
Built-In Screen Recording vs Third-Party Recording Tools
| Option | Best for | Pros | Cons |
| Built-in iPhone Screen Recording | Quick tutorials, bug demos, simple voiceovers | Free, native, fast, saves to Photos automatically. | Limited compared with pro recording tools; protected apps may block capture. |
| Third-party video tools | Branded demos, multi-person walkthroughs, and advanced editing | More control over layout and production workflow. | Extra setup, extra cost, and more complexity. |
For most users, the built-in method is the right one. It is simpler, faster, and already installed on the iPhone. Apple’s own documentation is enough for everyday screen recording.
Pro Tips and Hidden Tricks
- Long-press the button for audio every time you need commentary. That single habit prevents silent recordings.
- Stop the recording from the Red Circle at the top so you do not accidentally record extra steps. Apple confirms this stop method.
- Test on a simple app first before recording something important. It helps you confirm that the control, microphone, and save path all work.
- Check the photos right after finishing so you can confirm the clip saved correctly. Apple places recordings in Photos automatically.
- Avoid screen mirroring while recording because Apple says the two features cannot run together.
- Use silent mode or low notification interruptions if you want a cleaner tutorial.
- Trim the clip in Photos after saving if your recording includes extra seconds at the beginning or end. Apple’s Photos workflow supports quick editing after capture.
Common Mistakes to Avoid
- Tapping once when you actually needed to long-press for microphone audio
- Looking at the wrong Control Center layout
- Following outdated “Settings > Control Center > Customize Controls” instructions only
- Trying to record protected streaming content and assuming the iPhone is broken
- Forgetting that screen mirroring blocks screen recording
- Not checking Photos after stopping the recording
- Leaving storage nearly full before a long recording session
Apple’s current pages and modern troubleshooting guides make the same point from different angles: most problems come from setup, permissions, or app-level limits, not from a defective iPhone.
Privacy and Data Safety Notes
Screen recording can capture sensitive information very easily. Before you start, close personal apps, hide private notifications, and make sure you are not recording passwords, payment details, or private chats by mistake.
Also, remember that some apps do not allow capture, especially protected content. Apple notes this restriction clearly, so a black screen in those apps is often a privacy or rights-control feature, not an iPhone error.
FAQs
You need to add it to Control Center first. Apple’s current method is to open Control Center, touch and hold the background, tap Add a Control, and then choose Screen Recording.
Yes. Apple says the recording saves automatically to the Photos app when you stop it.
Open Control Center, long-press Screen Recording, turn on the Microphone, and then tap Start Recording.
Some apps do not allow their content to be recorded. Apple also says that screen recording cannot be used simultaneously with screen mirroring.
Open Photos, then go to Collections > Media Types > Screen Recordings.
Conclusion
The fastest way to add a screen record on iPhone is simple: open Control Center, add Screen Recording, and then tap it whenever you need a capture. If you want audio, long-press first and turn on the microphone. If it still seems missing or broken, Check Restrictions, storage, screen mirroring, and app limits before assuming something is wrong with the phone. Apple’s current guidance confirms the core workflow and the main limitations, so once you know the correct path, the feature is easy to use every time.